QML 国际化(i18n)实现思路
QML 国际化(i18n)实现思路
Qml 国际化翻译实现思路?

好的,QML 的国际化(i18n)实现思路非常清晰,主要依赖于 Qt 框架本身提供的国际化机制。其核心思想是:在 QML 中使用特定的函数标记所有需要翻译的字符串,然后利用 Qt 的工具生成翻译文件,由翻译人员填写译文,最后在程序中根据系统语言或用户选择加载对应的翻译文件。 以下是详细的实现思路和步骤: 核心思路
- 标记可翻译字符串:在 QML 文件中,将所有需要翻译的文本用 qsTr()、qsTranslate() 等函数包裹起来。
- 生成翻译源文件 (TS):使用 lupdate 工具扫描项目源代码,提取所有被标记的字符串,生成 .ts 文件(XML 格式)。
- 翻译:由翻译人员使用 Qt Linguist 工具或文本编辑器打开 .ts 文件,填写对应的译文。
- 编译翻译文件 (QM):使用 lrelease 工具将翻译好的 .ts 文件编译成高效的二进制 .qm 文件,供程序运行时使用。
- 加载翻译文件:在 C++ 的 main 函数中,使用 QTranslator 根据当前语言环境或用户设置,加载对应的 .qm 文件。
- 动态切换语言(可选):通过改变配置、发出信号、重启应用或动态重置界面等方式实现运行时语言切换。
详细步骤
- 在 QML 中标记字符串
使用 qsTr() 函数包裹任何需要翻译的字符串。
- 基本用法:
// Text { text: "Hello World" } // 错误!无法被工具提取Text { text: qsTr("Hello World") }// 正确Button { text: qsTr("Login") }- 带注释的翻译:为翻译人员提供上下文。
TitleText {//: This is a comment for the translator.//% "This is a string in the source code."text: qsTr("Main Window Title")}- 包含变量(复数形式):使用 qsTr() 的参数化字符串。
// %1, %2 等是占位符Text { text: qsTr("You have %1 message(s).").arg(messageCount) }对于更复杂的复数处理(如不同语言复数规则不同),可以使用 qsTrId() 配合 .pro 文件中的 TRANSLATIONS 部分来定义复数形式,但这稍微复杂一些,qsTr() 配合 .arg() 能满足大部分需求。
- 配置项目文件 (.pro)
在 Qt 项目文件 (.pro) 中,需要添加 lupdate 和 lrelease 工具所需的配置。
# your_project.pro # 指定源代码路径,lupdate 会扫描这些路径SOURCES += ... # 你的 C++ 源文件OTHER_FILES += ... # 你的 QML 文件 # 关键:指定要生成的翻译文件# 通常会为每种语言创建一个 .ts 文件TRANSLATIONS = \ translations/myapp_zh_CN.ts \ translations/myapp_ja_JP.ts \ translations/myapp_de_DE.ts # 可选:指定要扫描的额外文件类型(默认已包含 .qml)lupdate_only { # 如果 QML 文件不在 SOURCES 或 HEADERS 中,可以这样显式添加 SOURCES += $$files(*.qml, true)}- 生成和更新 TS 文件
使用 Qt 命令行工具或 Qt Creator 来生成 .ts 文件。
- 命令行方式:
# 进入项目目录lupdate your_project.pro这会在 translations/ 目录下生成(或更新)定义的 .ts 文件。
- Qt Creator 方式:
- 打开菜单 Tools -> External -> Linguist -> Update Translations (lupdate)。
- 同样会生成或更新 .ts 文件。
- 翻译 - 使用 Qt Linguist
- 打开 Qt Linguist 工具。
- File -> Open,选择生成的 .ts 文件(如 myapp_zh_CN.ts)。
- 在界面中,你会看到所有提取出来的字符串(Source text)和上下文(Context,通常是 QML 组件名)。
- 在下方的翻译区域填写译文(Translation)。
- 翻译完一个后,点击绿色勾号标记为“已完成”。
- 保存文件。
- 编译 QM 文件
翻译完成后,需要将 .ts 文件编译成更紧凑、运行时加载更快的 .qm 文件。
- 命令行方式:
lrelease your_project.pro# 或者指定单个文件lrelease translations/myapp_zh_CN.ts这会在 .ts 文件同级目录下生成同名的 .qm 文件。
- Qt Creator 方式:
- 打开菜单 Tools -> External -> Linguist -> Release Translations (lrelease)。
- 在应用程序中加载翻译器
这是最关键的一步,在 C++ 的 main.cpp 中完成。
// main.cpp#include <QGuiApplication>#include <QQmlApplicationEngine>#include <QTranslator>// 包含翻译器头文件int main(int argc, char *argv[]){ QGuiApplication app(argc, argv); // 1. 创建并安装一个全局的 QTranslator QTranslator translator; // 2. 根据情况决定加载哪个翻译文件// 示例 1:跟随系统语言// QString systemLanguage = QLocale::system().name(); // 如 "zh_CN", "de_DE"// translator.load(":/translations/myapp_" + systemLanguage + ".qm");// 示例 2:从设置中读取用户选择的语言// QSettings settings;// QString userLanguage = settings.value("language", "en").toString(); // 默认英语// if (userLanguage != "en") {// translator.load(":/translations/myapp_" + userLanguage + ".qm");// }// 示例 3:硬编码加载中文(用于测试)bool success = translator.load(":/translations/myapp_zh_CN.qm"); if (success) { qDebug() << "Load translation success."; } else { qDebug() << "Load translation failed!"; } // 3. 将翻译器安装到应用程序上 app.installTranslator(&translator); QQmlApplicationEngine engine; engine.load(QUrl(QStringLiteral("qrc:/main.qml"))); return app.exec();}重要:确保 .qm 文件被加入 Qt 的资源系统 (.qrc),否则程序可能找不到它。
<!-- translations.qrc --><RCC><qresource prefix="/"><file>translations/myapp_zh_CN.qm</file><file>translations/myapp_ja_JP.qm</file></qresource></RCC>- 动态切换语言(高级)
实现运行时切换语言比较复杂,因为需要刷新所有已显示的文本。常见思路是:
- 将语言设置保存到 QSettings 或其它配置中。
- 发射一个全局信号(例如通过一个 LanguageManager 单例),通知所有界面语言已变更。
- 在 QML 中,所有需要翻译的文本都应该绑定到一个属性上,当收到语言改变信号时,触发这个属性的重新计算(通常通过 qsTr() 的上下文 retranslate() 实现,但 QML 没有内置此功能)。
- 一个更简单但粗暴的方法是:退出当前界面并重新创建,或者甚至重启整个应用程序,让 main.cpp 根据新的设置重新加载翻译器。
一个常见的折中方案是提示用户重启应用以使语言更改生效。
总结与最佳实践
| 步骤 | 工具/函数 | 输入 | 输出 | 责任人 |
|---|---|---|---|---|
| 1. 标记 | qsTr("text") | QML 代码 | - | 开发者 |
| 2. 提取 | lupdate | .pro, 源代码 | .ts 文件 | 开发者 |
| 3. 翻译 | Qt Linguist | .ts 文件 | 翻译后的 .ts 文件 | 翻译者 |
| 4. 编译 | lrelease | .ts 文件 | .qm 文件 | 开发者/构建系统 |
| 5. 加载 | QTranslator | .qm 文件 | 翻译后的 UI | 应用程序 |
- 尽早并经常进行:在开发初期就引入国际化,避免后期重构。
- 避免拼接字符串:"Hello " + username 很难翻译,应使用 qsTr("Hello %1").arg(username)。
- 提供上下文注释:使用 //: 帮助翻译者理解文本的用法。
- 测试所有语言:确保 UI 在不同语言下布局依然正常,某些语言的文本可能更长。
- 将 .ts 文件纳入版本控制,但编译生成的 .qm 文件通常不需要。
按照这个思路,你就可以系统化地实现 QML 应用的国际化了。
依赖 QT 框架提供的国际化机制,通常遵循以下基本流程:
- 标记需要翻译的字符串:在代码中使用 QT 提供的翻译宏(如 tr())标识所有需要本地化的文本;
- 生成翻译源文件(TS 文件):使用 QT 工具(如 lupdate)提取代码中的可翻译文本,生成 TS 文件;
- 进行翻译:在 TS 文件中填写对应语言的译文;
- 动态切换语言:在应用程序中实现运行时语言切换功能,通过加载相应的 QM 文件实现。
上述流程主要适用于应用程序中内置的静态文本。此外,还需综合考虑以下方面的国际化处理:
- HTTP 接口返回的数据;
- 本地存储的持久化数据;
- 用户界面布局适配。
标记需要翻译的字符串
比如我们项目默认使用中文,需要国际化支持英文,需要先提取出需要翻译的中文文本。
- qml 文件,使用 qsTr("{中文文本}")
- cpp 文件,使用 QObject::tr("{中文文本}")
对于已经迭代较久的项目,逐条手动查找修改显然是一项枯燥且低效的体力劳动。其实,VS Code 的正则替换就能一键搞定;再不济,写个 Python 脚本也能批量处理。
// qml 中 text:"xxx" 替换为 text:qsTr("xxx")查找: (text:\\s*)"([^"]+)"替换: $1qsTr("$2") // cpp 中 = "xxx" 替换为 = QObject::tr("xxx")查找: =\\s*"([^"]*[\\u4e00-\\u9fa5][^"]*)"替换: = QObject::tr("$1") // 查询所有包含中文的文本查找: "[^"]*[\\u4e00-\\u9fa5][^"]*" 这种方式可快速提取项目中大部分中文文本,像 .qml 文件中 property var name: "xxx" ,.cpp 文件中夹杂使用的中文等需单独处理。
生成翻译源文件(TS 文件)
QT Creator → Build → Run CMake,后即可生成对应的 app_zh_CN.ts、app_en_US.ts 文件,每次编译都会增量更新 .ts 文件(已经翻译的部分不会被重置)。
💭注: app_zh_CN.ts 其中,zh 表示语言代码,CN 表示地区代码。
.ts 文件本质是 xml 文件,示例如下:
<?xml version="1.0" encoding="utf-8"?><!DOCTYPE TS><TS version="2.1" language="en_US"><context> <name>MainPage</name> <message> <location filename="../qml/MainPage.qml" line="13"/> <source>Qt6 国际化示例</source> <translation type="unfinished"></translation> </message> <message> <location filename="../qml/MainPage.qml" line="59"/> <source>多语言演示应用</source> <translation type="unfinished"></translation> </message> <message> <location filename="../qml/MainPage.qml" line="85"/> <source>欢迎使用本应用</source> <translation type="unfinished"></translation> </message> <message> <location filename="../qml/MainPage.qml" line="92"/> <source>当前语言: %1</source> <translation type="unfinished"></translation> </message> <message> <location filename="../qml/MainPage.qml" line="117"/> <source>选择语言</source> <translation type="unfinished"></translation> </message> <message> <location filename="../qml/MainPage.qml" line="132"/> <source>English</source> <translation type="unfinished"></translation> </message> <message> <location filename="../qml/MainPage.qml" line="138"/> <source>中文</source> <translation type="unfinished"></translation> </message> <message> <location filename="../qml/MainPage.qml" line="162"/> <source>用户名:</source> <translation type="unfinished"></translation> </message> <message> <location filename="../qml/MainPage.qml" line="166"/> <source>请输入用户名</source> <translation type="unfinished"></translation> </message> <message> <location filename="../qml/MainPage.qml" line="171"/> <source>密码:</source> <translation type="unfinished"></translation> </message> <message> <location filename="../qml/MainPage.qml" line="175"/> <source>请输入密码</source> <translation type="unfinished"></translation> </message> <message> <location filename="../qml/MainPage.qml" line="199"/> <source>小白</source> <translation type="unfinished"></translation> </message> <message> <location filename="../qml/MainPage.qml" line="203"/> <source>欢迎使用美的产品</source> <translation type="unfinished"></translation> </message> <message> <location filename="../qml/MainPage.qml" line="209"/> <source>字体大小</source> <translation type="unfinished"></translation> </message> <message> <location filename="../qml/MainPage.qml" line="225"/> <source>跳转到第二个页面</source> <translation type="unfinished"></translation> </message> <message> <location filename="../qml/MainPage.qml" line="232"/> <source>跳转到第三个页面</source> <translation type="unfinished"></translation> </message> <message> <location filename="../qml/MainPage.qml" line="248"/> <source>© 2023 Qt6 国际化示例 | 版本: 1.0.0</source> <translation type="unfinished"></translation> </message></context></TS>翻译
这一步主要是在 TS 文件中填写对应语言的译文。
借助 AI 翻译工具
可以编写 Python 脚本,调用 DeepSeek Api 进行翻译:
#!/usr/bin/python3 import xml.etree.ElementTree as ETimport reimport timefrom openai import OpenAI # 总结:# 1. 该脚本处理 TS 文件,翻译其中的文本内容。# 2. 使用 DeepSeek API 进行翻译,支持中文到英文的翻译。# 4. 确保翻译后的文本格式正确,并保留原有 XML 声明和 DOCTYPE。# 5. 输出文件名 包含当前日期时间,格式为 "app_en_US_translated_MMDD-HHMM.ts"。 # 初始化 DeepSeek API 客户端client = OpenAI(api_key="{key}", base_url="https://api.deepseek.com") def translate_text(text, source_lang="zh", target_lang="en"): """ 使用 DeepSeek API 翻译文本: - text: 待翻译的文本 - source_lang: 源语言(例如 "zh") - target_lang: 目标语言(例如 "en") """ # 构造对话消息 messages = [ { "role": "system", "content": f"你是一位专业的手机软件国际化翻译助手,尽量保持翻译结果简短,请将以下文本从 {source_lang} 翻译成 {target_lang}。" }, { "role": "user", "content": text } ] try: # 调用 DeepSeek 的聊天接口获取翻译结果 response = client.chat.completions.create( model="deepseek-chat", messages=messages, stream=False, max_tokens=2048, temperature=0.3 ) # 提取翻译后的文本 translation = response.choices[0].message.content return "新翻译 " + translation.strip() except Exception as e: print(f"翻译错误: {e}") return "[翻译失败]" def contains_chinese(text): """检查文本是否包含中文字符""" return re.search(r'[\u4e00-\u9fff]', text) is not None def translate_ts_file(input_file, output_file): # 解析 XML 文件 tree = ET.parse(input_file) root = tree.getroot() # 遍历所有 context 和 message for context in root.findall('context'): for message in context.findall('message'): # 获取 source 文本 source_elem = message.find('source') source_text = source_elem.text if source_elem is not None and source_elem.text else "" # 跳过空值或不包含中文的项 if not source_text or not contains_chinese(source_text): continue # 获取 translation 元素 translation_elem = message.find('translation') if translation_elem is None: continue # 获取 translation 文本 translation_text = translation_elem.text if translation_elem.text else "" # 检查是否需要翻译 if not translation_text and source_text: print(f"翻译中: {source_text}") # 翻译文本 new_translation = translate_text(source_text) # 更新 translation 元素 translation_elem.text = new_translation # 移除 'unfinished' 属性 if 'type' in translation_elem.attrib and translation_elem.attrib['type'] == 'unfinished': del translation_elem.attrib['type'] # API限流 time.sleep(0.5) # 保存为新的 TS 文件 tree.write(output_file, encoding='utf-8', xml_declaration=False) print(f"成功生成翻译后的 TS 文件: {output_file}") def add_xml_declaration(input_file, output_file): """确保文件顶部有正确的 XML 声明和 DOCTYPE""" with open(output_file, 'r', encoding='utf-8') as f: content = f.read() # 确保有 XML 声明和 DOCTYPE if not content.startswith('<?xml'): with open(input_file, 'r', encoding='utf-8') as orig_f: first_line = orig_f.readline() second_line = orig_f.readline() # 添加 XML 声明和 DOCTYPE content = first_line + second_line + content # 写回文件 with open(output_file, 'w', encoding='utf-8') as f: f.write(content) if __name__ == "__main__": input_ts = "app_en_US.ts" # 输入的 TS 文件名 # 生成带日期时间的输出文件名 current_time = time.strftime("%m%d-%H%M") # 格式: 月日-时分 output_ts = f"app_en_US_translated_{current_time}.ts" # 输出的 TS 文件名 # 翻译并生成新文件 translate_ts_file(input_ts, output_ts) # 确保新文件有正确的 XML 声明 add_xml_declaration(input_ts, output_ts) print("处理完成!")翻译后的 app_en_US.ts 文件如下:
<?xml version="1.0" encoding="utf-8"?><!DOCTYPE TS><TS version="2.1" language="en_US"><context> <name>MainPage</name> <message> <location filename="../qml/MainPage.qml" line="13"/> <source>Qt6 国际化示例</source> <translation>Qt6 Internationalization Example</translation> </message> <message> <location filename="../qml/MainPage.qml" line="59"/> <source>多语言演示应用</source> <translation>Multilingual Demo App</translation> </message> <message> <location filename="../qml/MainPage.qml" line="85"/> <source>欢迎使用本应用</source> <translation>Welcome to the app</translation> </message> <message> <location filename="../qml/MainPage.qml" line="92"/> <source>当前语言: %1</source> <translation>Current language: %1</translation> </message> <message> <location filename="../qml/MainPage.qml" line="117"/> <source>选择语言</source> <translation>Choose Language</translation> </message> <message> <location filename="../qml/MainPage.qml" line="132"/> <source>English</source> <translation type="unfinished"></translation> </message> <message> <location filename="../qml/MainPage.qml" line="138"/> <source>中文</source> <translation>Chinese</translation> </message> <message> <location filename="../qml/MainPage.qml" line="162"/> <source>用户名:</source> <translation>Username:</translation> </message> <message> <location filename="../qml/MainPage.qml" line="166"/> <source>请输入用户名</source> <translation>Please enter your username</translation> </message> <message> <location filename="../qml/MainPage.qml" line="171"/> <source>密码:</source> <translation>Password:</translation> </message> <message> <location filename="../qml/MainPage.qml" line="175"/> <source>请输入密码</source> <translation>Please enter the password</translation> </message> <message> <location filename="../qml/MainPage.qml" line="199"/> <source>小白</source> <translation>Little White</translation> </message> <message> <location filename="../qml/MainPage.qml" line="203"/> <source>欢迎使用美的产品</source> <translation>Welcome to Midea Products</translation> </message> <message> <location filename="../qml/MainPage.qml" line="209"/> <source>字体大小</source> <translation>Font size</translation> </message> <message> <location filename="../qml/MainPage.qml" line="225"/> <source>跳转到第二个页面</source> <translation>Jump to the second page</translation> </message> <message> <location filename="../qml/MainPage.qml" line="232"/> <source>跳转到第三个页面</source> <translation>Jump to the third page</translation> </message> <message> <location filename="../qml/MainPage.qml" line="248"/> <source>© 2023 Qt6 国际化示例 | 版本: 1.0.0</source> <translation>© 2023 Qt6 Internationalization Example | Version: 1.0.0</translation> </message></context></TS> 术语处理
应用软件术语、人名、地名等翻译需要特殊处理,一些专有名词、软件术语可以参考 Human Interface Guidelines、Microsoft 术语 和开源应用软件里面的中英文翻译文件(例如 GitHub 上 Telegram)等。
| 英文术语 | 中文术语 |
|---|---|
| Human Interface Guidelines | 人机界面指南 |
| Camera Control | 相机控制 |
| Gestures | 手势 |
| Designing for games | 针对游戏设计 |
| Immersive experiences | 沉浸式体验 |
| Controls | 控件 |
| App icons | App 图标 |
| Featured | 精选 |
| Designing for visionOS | 针对 visionOS 设计 |
| Accessibility | 辅助功能 |
| SF Symbols | SF 符号 |
| Typography | 排版 |
| Writing | 书写 |
| Game controls | 游戏控件 |
| Topics | 主题 |
| Getting started | 入门 |
| Foundations | 基础 |
| Patterns | 模式 |
| Components | 组件 |
| Inputs | 输入 |
| Technologies | 技术 |
基于 DeepSeek 实现国际化翻译 Python 脚本,添加专有词汇翻译(如 "美的" → "MD")的处理。
基于 DeepSeek 实现国际化翻译并添加专有词汇翻译(如 "美的" → "MD")的系统,可采用以下实现思路?
- 构建专有词汇表
- 格式:JSON/YAML 键值对(支持正则表达式)
{ "美的": "MD", "TCL": "TCL",// 保留原名"格力": "Gree", "华为\\s*云": "Huawei Cloud",// 正则匹配"海尔": "Haier"}- 特性:
- 支持大小写敏感/不敏感配置
- 支持词组匹配(如 "智能家居" → "SmartHome")
- 支持上下文规则(特定场景下启用不同翻译)
- 预处理流程
def preprocess(text: str, glossary: dict) -> str:# 按关键词长度降序(优先匹配长词组) sorted_terms = sorted(glossary.keys(), key=len, reverse=True) for term in sorted_terms:# 使用占位符替换专有词汇(保留原位置) placeholder = f"__GLOSSARY_{hash(term)}__" text = re.sub(term, placeholder, text, flags=re.IGNORECASE) return text- 集成 DeepSeek 翻译
def translate_with_glossary(text: str, target_lang: str):# 加载词汇表 glossary = load_glossary("glossary.json") # 预处理:专有词 → 占位符 processed_text = preprocess(text, glossary) # 调用DeepSeek API api_params = { "text": processed_text, "target_lang": target_lang, "model": "deepseek-translator-v2" } response = requests.post(DEEPSEEK_API_URL, json=api_params) translated = response.json()["translation"] # 后处理:占位符 → 目标词汇for term, target in glossary.items(): placeholder = f"__GLOSSARY_{hash(term)}__" translated = translated.replace(placeholder, target) return translated- 边界情况处理
- 冲突解决:
- 当多个词汇重叠时(如 "华为云" vs "华为"),采用最长匹配优先原则
- 使用特殊标记避免误替换:{{美的}} → MD(可选)
- 语言适配:
- 为不同语言创建独立词汇表(glossary_en.json, glossary_es.json)
- 自动处理复数/时态变化(如 "device" → "devices")
性能优化策略
- 缓存机制:
- 对高频词汇建立翻译缓存(LRU Cache)
- 缓存预处理后的中间文本
- 异步处理:
# 使用异步IO处理批量翻译async def batch_translate(texts: list): return await asyncio.gather(*[translate(text) for text in texts])- 增量更新:
- 词汇表热加载(无需重启服务)
- 版本控制(A/B测试不同词汇表效果)
#!/usr/bin/python3 import xml.etree.ElementTree as ETimport reimport timefrom openai import OpenAI # 总结:# 1. 该脚本处理 TS 文件,翻译其中的文本内容。# 2. 使用 DeepSeek API 进行翻译,支持中文到英文的翻译。# 3. 添加专有词汇翻译功能,优先处理特定词汇# 4. 确保翻译后的文本格式正确,并保留原有 XML 声明和 DOCTYPE。# 5. 输出文件名 包含当前日期时间,格式为 "app_en_US_translated_MMDD-HHMM.ts"。 # 初始化 DeepSeek API 客户端client = OpenAI(api_key="{key}", base_url="https://api.deepseek.com") # 专有词汇字典,使用正则表达式模式匹配PROPRIETARY_TERMS = { r"美的": "MD", r"小白": "Xiao Bai", r"华为\s*云": "Huawei Cloud",} def translate_proprietary_terms(text): """ 先处理专有词汇,将其替换为预定义的翻译 """ for pattern, replacement in PROPRIETARY_TERMS.items(): text = re.sub(pattern, replacement, text) return text def translate_text(text, source_lang="zh", target_lang="en"): """ 使用 DeepSeek API 翻译文本: - text: 待翻译的文本 - source_lang: 源语言(例如 "zh") - target_lang: 目标语言(例如 "en") """ # 先处理专有词汇 processed_text = translate_proprietary_terms(text) # 如果文本已经完全由专有词汇组成,无需进一步翻译 if processed_text != text: print(f"专有词汇替换: '{text}' -> '{processed_text}'") # 如果处理后不再包含中文,直接返回 if not contains_chinese(processed_text): return processed_text # 构造对话消息 messages = [ { "role": "system", "content": f"你是一位专业的手机软件国际化翻译助手,尽量保持翻译结果简短,请将以下文本从 {source_lang} 翻译成 {target_lang}。注意:文本中可能已包含一些专有名词的翻译,请保留它们不变。" }, { "role": "user", "content": processed_text } ] try: # 调用 DeepSeek 的聊天接口获取翻译结果 response = client.chat.completions.create( model="deepseek-chat", messages=messages, stream=False, max_tokens=2048, temperature=0.3 ) # 提取翻译后的文本 translation = response.choices[0].message.content return translation.strip() except Exception as e: print(f"翻译错误: {e}") return f"[翻译失败] {processed_text}" def contains_chinese(text): """检查文本是否包含中文字符""" return re.search(r'[\u4e00-\u9fff]', text) is not None def translate_ts_file(input_file, output_file): # 解析 XML 文件 tree = ET.parse(input_file) root = tree.getroot() # 遍历所有 context 和 message for context in root.findall('context'): for message in context.findall('message'): # 获取 source 文本 source_elem = message.find('source') source_text = source_elem.text if source_elem is not None and source_elem.text else "" # 跳过空值或不包含中文的项 if not source_text or not contains_chinese(source_text): continue # 获取 translation 元素 translation_elem = message.find('translation') if translation_elem is None: continue # 获取 translation 文本 translation_text = translation_elem.text if translation_elem.text else "" # 检查是否需要翻译 if not translation_text and source_text: print(f"翻译中: {source_text}") # 翻译文本 new_translation = translate_text(source_text) # 更新 translation 元素 translation_elem.text = new_translation # 移除 'unfinished' 属性 if 'type' in translation_elem.attrib and translation_elem.attrib['type'] == 'unfinished': del translation_elem.attrib['type'] # API限流 time.sleep(0.5) # 保存为新的 TS 文件 tree.write(output_file, encoding='utf-8', xml_declaration=False) print(f"成功生成翻译后的 TS 文件: {output_file}") def add_xml_declaration(input_file, output_file): """确保文件顶部有正确的 XML 声明和 DOCTYPE""" with open(output_file, 'r', encoding='utf-8') as f: content = f.read() # 确保有 XML 声明和 DOCTYPE if not content.startswith('<?xml'): with open(input_file, 'r', encoding='utf-8') as orig_f: first_line = orig_f.readline() second_line = orig_f.readline() # 添加 XML 声明和 DOCTYPE content = first_line + second_line + content # 写回文件 with open(output_file, 'w', encoding='utf-8') as f: f.write(content) if __name__ == "__main__": input_ts = "app_en_US.ts" # 输入的 TS 文件名 # 生成带日期时间的输出文件名 current_time = time.strftime("%m%d-%H%M") # 格式: 月日-时分 output_ts = f"app_en_US_translated_{current_time}.ts" # 输出的 TS 文件名 # 翻译并生成新文件 translate_ts_file(input_ts, output_ts) # 确保新文件有正确的 XML 声明 add_xml_declaration(input_ts, output_ts) print("处理完成!")测试翻译后的 app_en_US.ts 文件如下:
<?xml version="1.0" encoding="utf-8"?><!DOCTYPE TS><TS version="2.1" language="en_US"><context> <name>MainPage</name> <message> <location filename="../qml/MainPage.qml" line="13"/> <source>Qt6 国际化示例</source> <translation>Qt6 Internationalization Example</translation> </message> <message> <location filename="../qml/MainPage.qml" line="59"/> <source>多语言演示应用</source> <translation>Multilingual Demo App</translation> </message> <message> <location filename="../qml/MainPage.qml" line="85"/> <source>欢迎使用本应用</source> <translation>Welcome to the app</translation> </message> <message> <location filename="../qml/MainPage.qml" line="92"/> <source>当前语言: %1</source> <translation>Current language: %1</translation> </message> <message> <location filename="../qml/MainPage.qml" line="117"/> <source>选择语言</source> <translation>Choose Language</translation> </message> <message> <location filename="../qml/MainPage.qml" line="132"/> <source>English</source> <translation type="unfinished"></translation> </message> <message> <location filename="../qml/MainPage.qml" line="138"/> <source>中文</source> <translation>Chinese</translation> </message> <message> <location filename="../qml/MainPage.qml" line="162"/> <source>用户名:</source> <translation>Username:</translation> </message> <message> <location filename="../qml/MainPage.qml" line="166"/> <source>请输入用户名</source> <translation>Please enter your username</translation> </message> <message> <location filename="../qml/MainPage.qml" line="171"/> <source>密码:</source> <translation>Password:</translation> </message> <message> <location filename="../qml/MainPage.qml" line="175"/> <source>请输入密码</source> <translation>Please enter the password</translation> </message> <message> <location filename="../qml/MainPage.qml" line="198"/> <source>小白、美的、华为云</source> <translation>Xiao Bai、MD、Huawei Cloud</translation> </message> <message> <location filename="../qml/MainPage.qml" line="202"/> <source>你好,小白!</source> <translation>Hello, Xiao Bai!</translation> </message> <message> <location filename="../qml/MainPage.qml" line="206"/> <source>欢迎使用美的产品</source> <translation>Welcome to MD Products</translation> </message> <message> <location filename="../qml/MainPage.qml" line="210"/> <source>华为云提供稳定可靠、安全可信、可持续发展的云服务</source> <translation>Huawei Cloud delivers stable, reliable, secure, and sustainable cloud services.</translation> </message> <message> <location filename="../qml/MainPage.qml" line="215"/> <source>字体大小</source> <translation>Font size</translation> </message> <message> <location filename="../qml/MainPage.qml" line="231"/> <source>跳转到第二个页面</source> <translation>Jump to the second page</translation> </message> <message> <location filename="../qml/MainPage.qml" line="238"/> <source>跳转到第三个页面</source> <translation>Jump to the third page</translation> </message> <message> <location filename="../qml/MainPage.qml" line="253"/> <source>© 2023 Qt6 国际化示例 | 版本: 1.0.0</source> <translation>© 2023 Qt6 Internationalization Example | Version: 1.0.0</translation> </message></context></TS> 翻译准确性
常规翻译软件(包含 ai 云翻译)都是直译,与本地化实际用语差异较大(比如 Wi-Fi、wifi 、还是 WIFI,返回是 back 还是 return),还是需要人工校验。
使用本地化校验工具
一些本地化在线编辑工具可以帮助进行翻译校验,把翻译文件转化为工具支持的文件格式,通过人工校验后在转回。
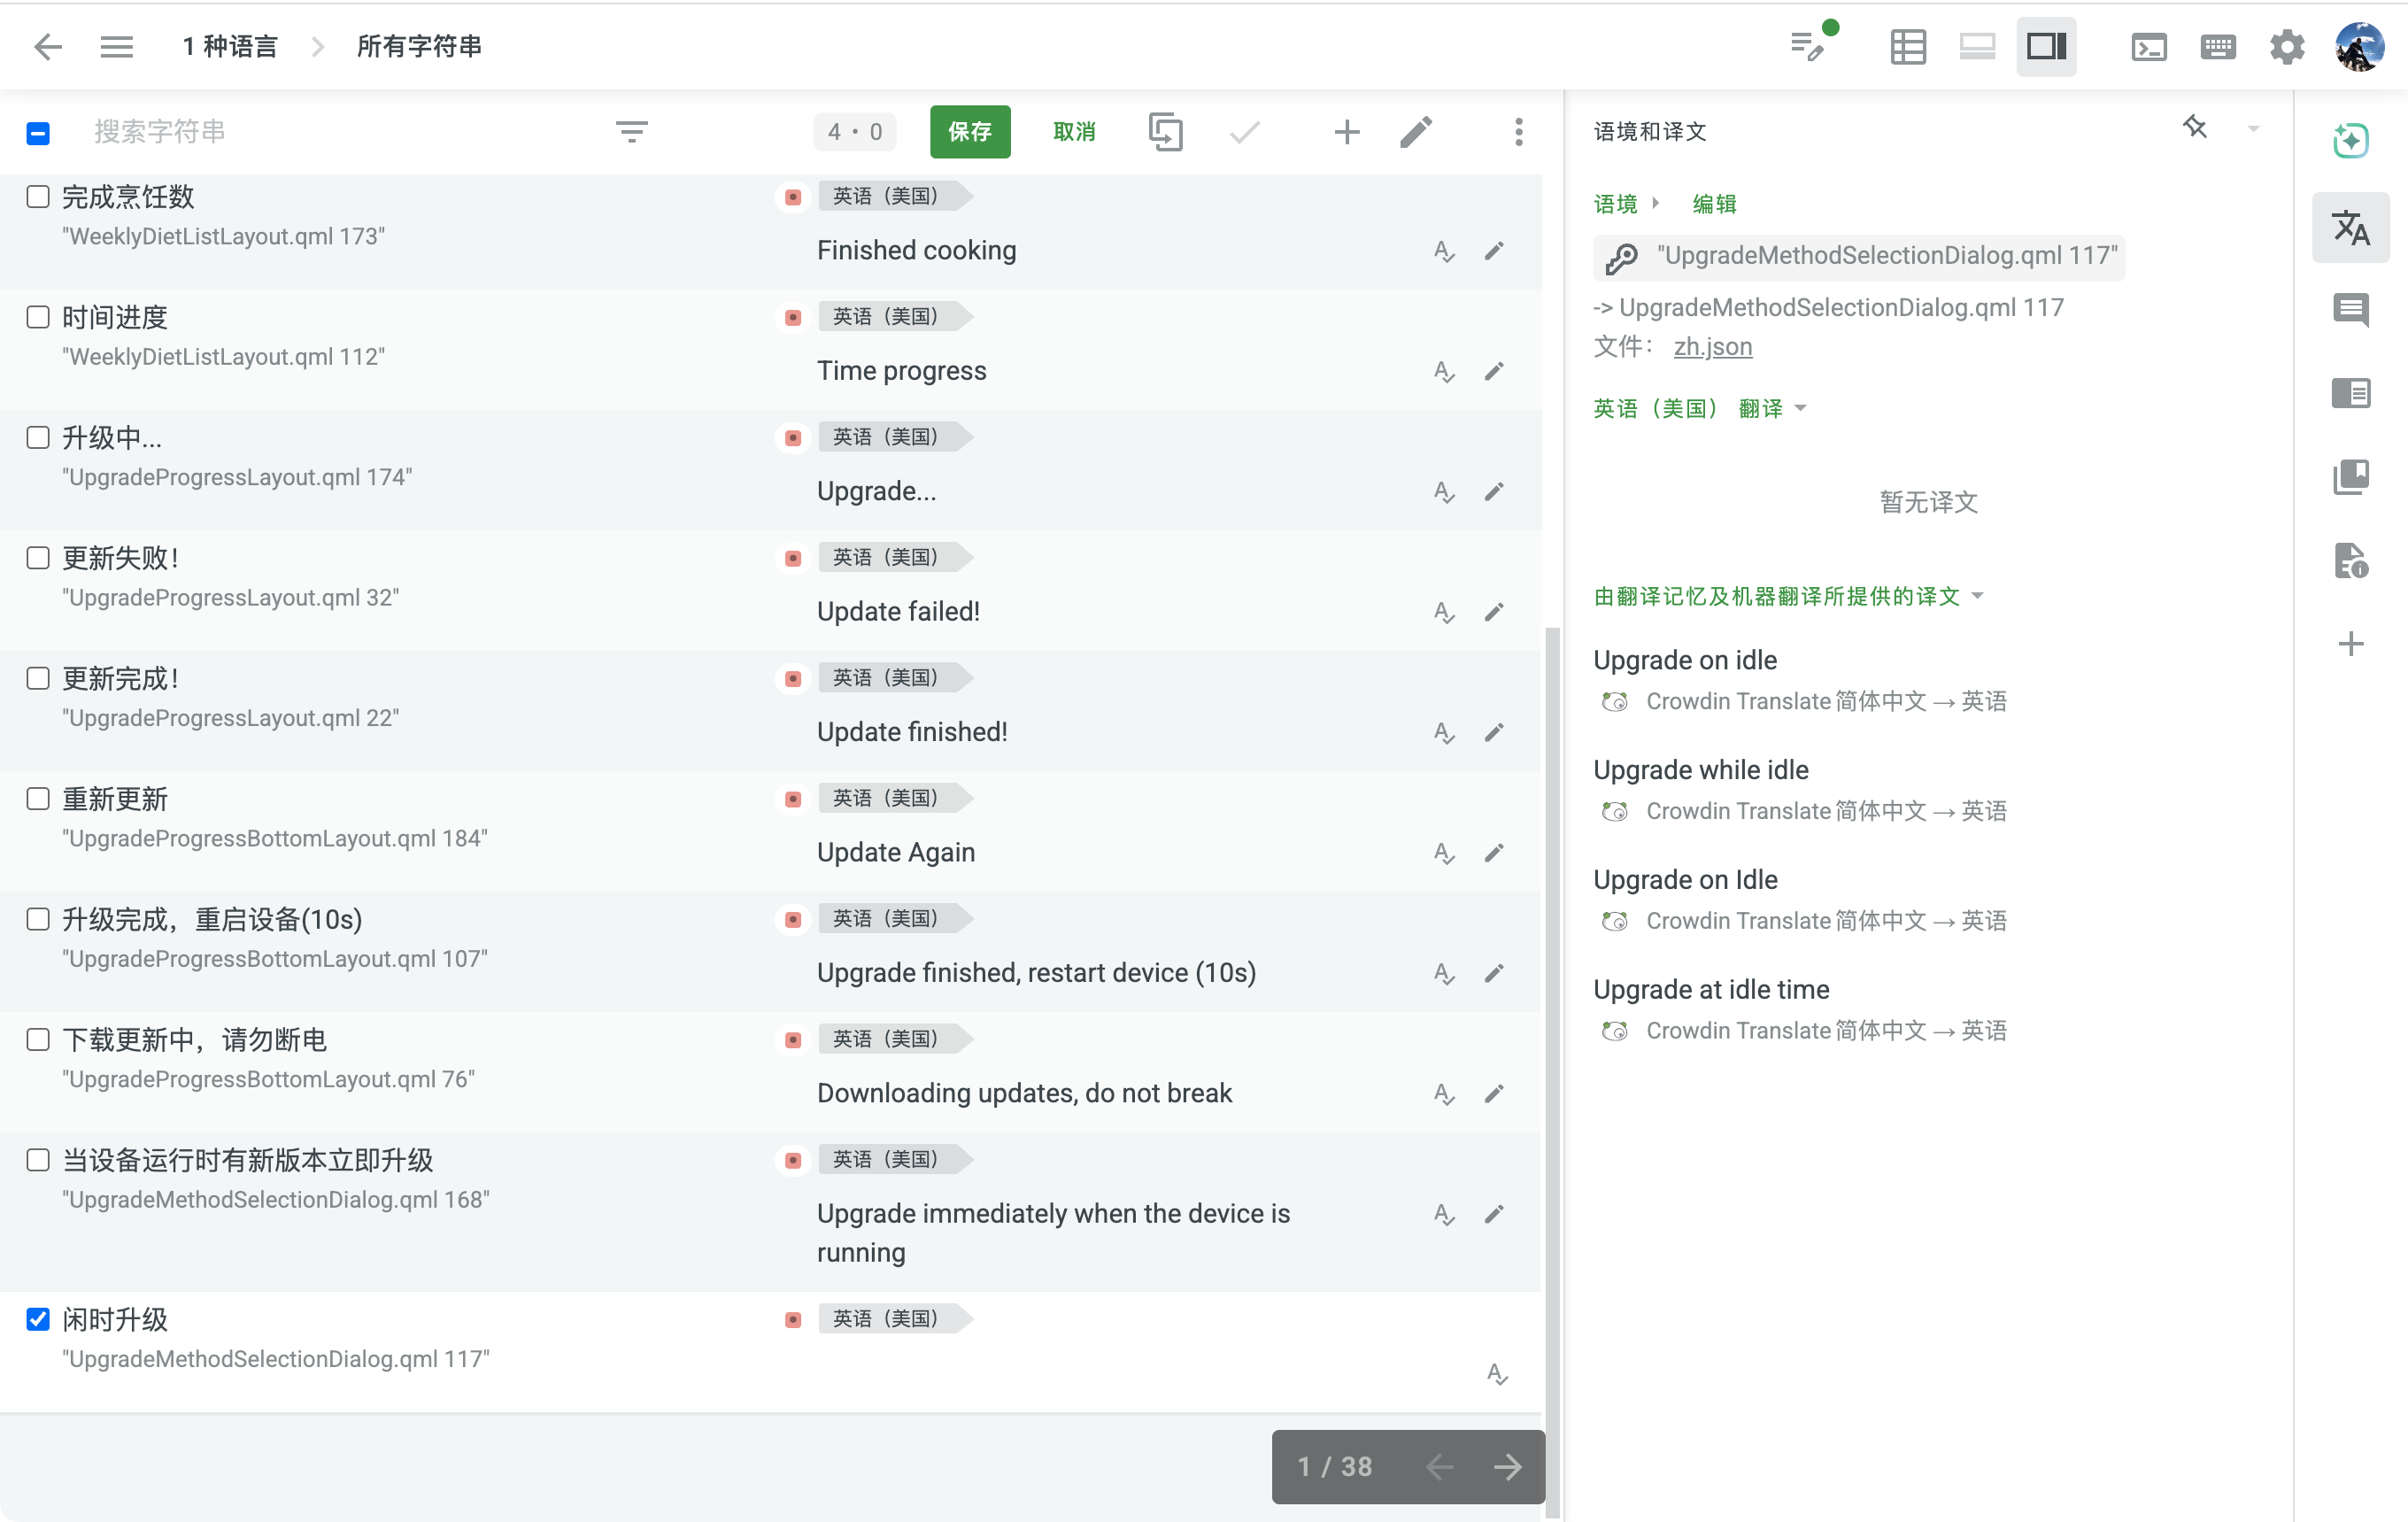
使用脚本导出 excel 表格
也可以把 .ts 文件直接导出为 excel 表格,在人工校验后,在转回 .ts 文件。
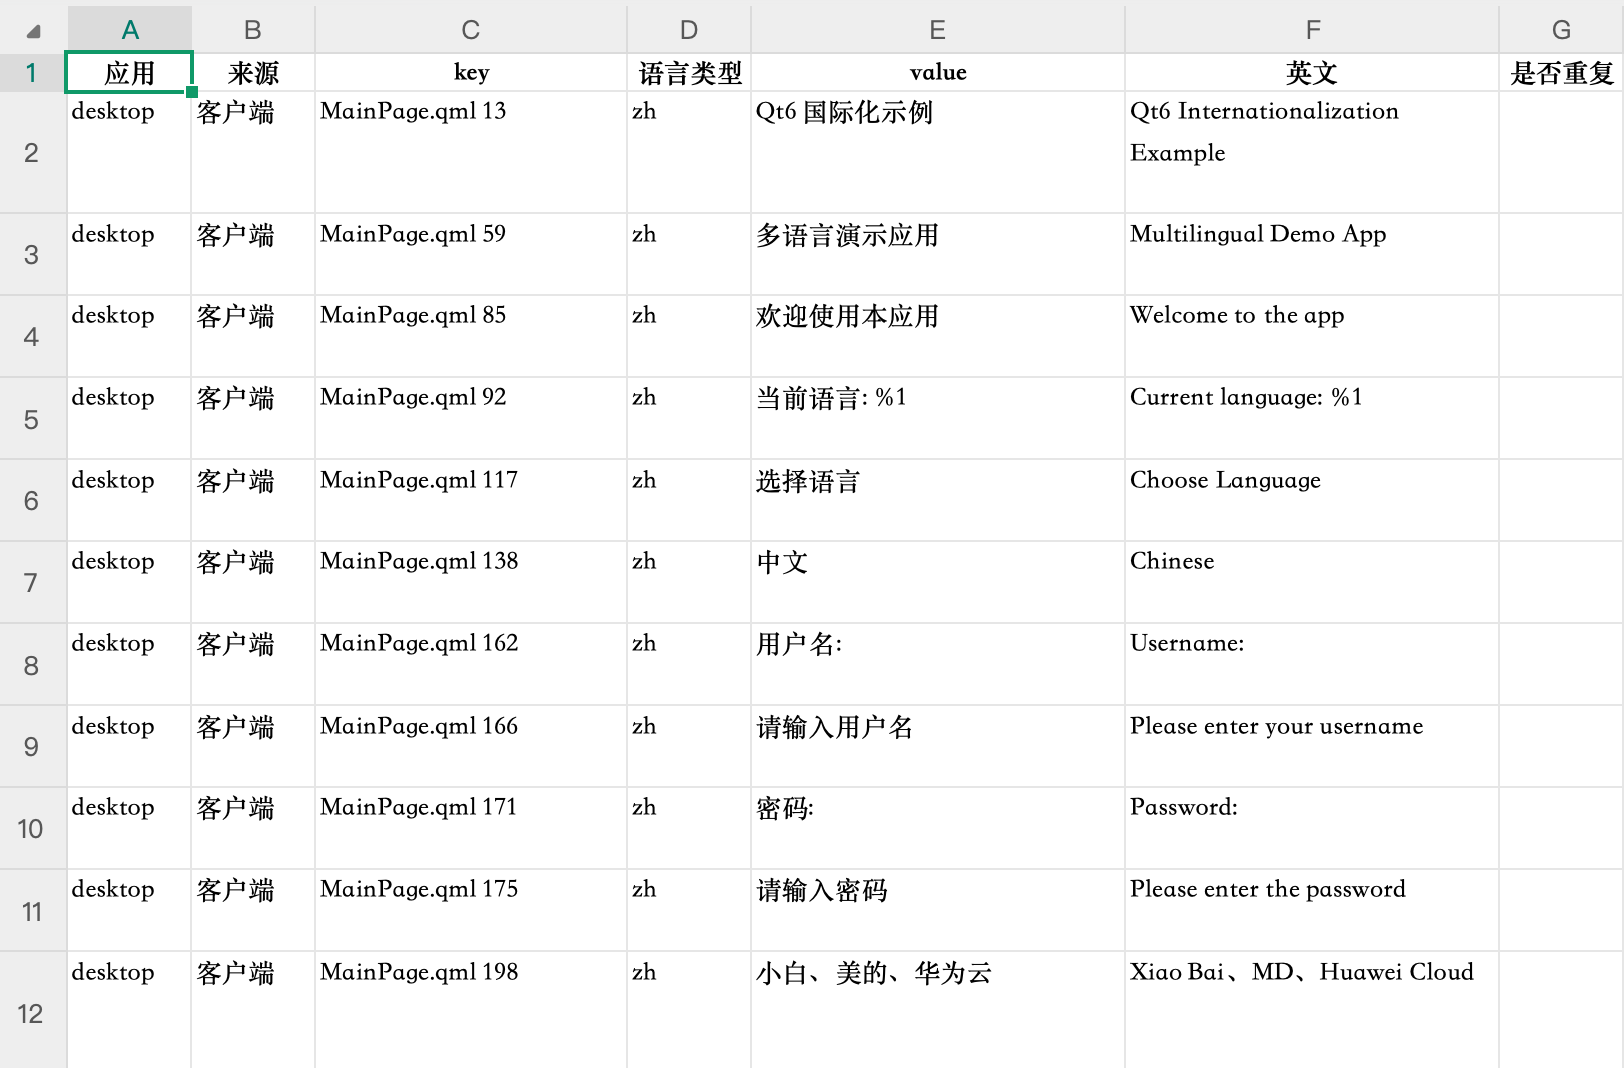
.ts 文件导出 excel 表格的 Python 脚本:
#!/usr/bin/python3 import xml.etree.ElementTree as ETimport osimport refrom openpyxl import Workbookfrom openpyxl.styles import Font, Alignmentfrom openpyxl.utils import get_column_letter # 1. 解析 XML 文件并导出到 Excel# 2. 处理 XML 中的 context 和 message 元素# 3. 统计 source 出现次数# 4. 生成 Excel 文件,包含应用、来源、key、语言类型、value、是否重复和描述字段# 5. 检查 source 是否包含中文字符# 6. 跳过空值或不包含中文的项# 7. 跳过重复项# 8. 新建英文翻译列 def contains_chinese(text): """检查文本是否包含中文字符""" return re.search(r'[\u4e00-\u9fff]', text) is not None def parse_xml_and_export_to_excel(input_file, output_file): # 解析 XML 文件 tree = ET.parse(input_file) root = tree.getroot() # 准备数据结构 entries = [] seen_sources = set() # 用于检测重复项 # 遍历 XML 结构 for context in root.findall('context'): for message in context.findall('message'): # 获取第一个 location 的 filename 属性 location = message.find('location') if location is not None: # 提取文件名和行号 full_path = location.get('filename', '') line = location.get('line', '') # 从完整路径中提取文件名 filename = os.path.basename(full_path) if full_path else "" # 组合为 "文件名 行号" 格式 filename_line = f"{filename} {line}" if filename and line else "" else: filename_line = "" # 获取 source 文本 source_elem = message.find('source') source_text = source_elem.text if source_elem is not None and source_elem.text else "" # 跳过空值或不包含中文的项 if not source_text or not contains_chinese(source_text): continue # 跳过重复项 if source_text in seen_sources: continue seen_sources.add(source_text) # 获取 translation 文本 translation_elem = message.find('translation') translation_text = translation_elem.text if translation_elem is not None and translation_elem.text else "" # 获取整个 message 的 XML 结构作为 des des_xml = ET.tostring(message, encoding='unicode', method='xml') des = " ".join(line.strip() for line in des_xml.splitlines() if line.strip()) # 添加到条目列表 if filename_line: entries.append({ 'filename': filename_line, 'source': source_text, 'translation': translation_text, 'des': des }) # 创建 Excel 工作簿 wb = Workbook() ws = wb.active ws.title = "Translations" # 设置表头(新增"英文"列) headers = ["应用", "来源", "key", "语言类型", "value", "英文", "是否重复", "des"] for col_num, header in enumerate(headers, 1): col_letter = get_column_letter(col_num) cell = ws[f"{col_letter}1"] cell.value = header cell.font = Font(bold=True) cell.alignment = Alignment(horizontal='center') # 填充数据 for row_num, entry in enumerate(entries, 2): # 填充数据行 ws[f"A{row_num}"] = "desktop" # 应用 ws[f"B{row_num}"] = "客户端" # 来源 ws[f"C{row_num}"] = entry['filename'] # key (文件名+行号) ws[f"D{row_num}"] = "zh" # 语言类型 ws[f"E{row_num}"] = entry['source'] # value (中文) ws[f"F{row_num}"] = entry['translation'] # 英文翻译 ws[f"G{row_num}"] = "" # 是否重复 ws[f"H{row_num}"] = entry['des'] # des (完整的message XML结构) # 设置列宽(调整列宽以适应新增列) column_widths = { 'A': 10, # 应用 'B': 10, # 来源 'C': 25, # key (文件名+行号) 'D': 10, # 语言类型 'E': 30, # value (中文) 'F': 30, # 英文 'G': 10, # 是否重复 'H': 80 # des (完整XML结构) } for col_letter, width in column_widths.items(): ws.column_dimensions[col_letter].width = width # 设置自动换行 for row in ws.iter_rows(min_row=2, max_row=len(entries)+1): for cell in row: cell.alignment = Alignment(wrap_text=True, vertical='top') # 保存 Excel 文件 wb.save(output_file) print(f"成功导出 {len(entries)} 条记录到 {output_file}") if __name__ == "__main__": input_xml = "app_en_US.ts" # 输入的 XML 文件名 output_excel = "Translations-0604.xlsx" # 输出的 Excel 文件名 parse_xml_and_export_to_excel(input_xml, output_excel)导出的表格如下:
在人功校验翻译后,再通过脚本更新 .ts 文件,Python 脚本如下:
#!/usr/bin/python3 import pandas as pdimport xml.etree.ElementTree as ETimport timeimport sysimport os # 思路:提取表格里面的 value、修订后英文栏放入 map,然后读取 .ts 文件进行替换# 执行: python3 replace_ts.py Translations.xlsx app_en_US.ts def load_mapping_from_excel(xlsx_path, col_source='value', col_target='修订后英文'): """ 解析 xlsx,读取两列,返回 {source: target} 映射。 只保留 target 非空的行。 """ df = pd.read_excel(xlsx_path, dtype=str) df = df.fillna('') # 将 NaN 转为空字符串 mapping = {} for src, tgt in zip(df[col_source], df[col_target]): src = src.strip() tgt = tgt.strip() if src and tgt: mapping[src] = tgt return mapping def replace_translations_in_ts(input_ts, output_ts, mapping): """ 遍历 TS 文件,用 mapping 替换 <translation> 文本。 """ # 解析 XML parser = ET.XMLParser(encoding='utf-8') tree = ET.parse(input_ts, parser=parser) root = tree.getroot() # 遍历所有 message 节点 for message in root.findall('.//message'): src_elem = message.find('source') if src_elem is None or not src_elem.text: continue src_text = src_elem.text.strip() # 如果在映射表中,替换 translation if src_text in mapping: tgt_text = mapping[src_text] tr_elem = message.find('translation') if tr_elem is None: # 如果没有 translation 元素,就创建一个 tr_elem = ET.SubElement(message, 'translation') # 设置新文本 tr_elem.text = tgt_text # 移除 unfinished 标记 if tr_elem.get('type') == 'unfinished': del tr_elem.attrib['type'] # 写入文件(保留原声明和 DOCTYPE) tree.write(output_ts, encoding='utf-8', xml_declaration=False) def ensure_declaration(input_ts, output_ts): """ 确保输出文件顶部有 XML 声明和 DOCTYPE 声明。 """ with open(output_ts, 'r', encoding='utf-8') as f: content = f.read() # 如果缺少声明,则从原文件前两行拷贝 if not content.startswith('<?xml'): with open(input_ts, 'r', encoding='utf-8') as fin: header = ''.join([fin.readline() for _ in range(2)]) content = header + content with open(output_ts, 'w', encoding='utf-8') as fout: fout.write(content) def main(): if len(sys.argv) < 3: print("用法: python3 replace_ts.py Translations.xlsx app_en_US.ts") sys.exit(1) xlsx_path = sys.argv[1] input_ts = sys.argv[2] # 带时间戳的输出文件名 stamp = time.strftime("%m%d-%H%M") base, ext = os.path.splitext(input_ts) output_ts = f"{base}_replaced_{stamp}{ext}" print("加载映射…") mapping = load_mapping_from_excel(xlsx_path) print(f"处理 TS 文件: {input_ts} → {output_ts}") replace_translations_in_ts(input_ts, output_ts, mapping) print("确保声明…") ensure_declaration(input_ts, output_ts) print("完成!输出文件:", output_ts) if __name__ == "__main__": main()HTTP 接口处理
- Http 接口请求时支持多语言
一般有两种处理方式:
- 云端接口请求时 header 添加目标的语言,响应的数据结构保持一致。
// 返回中文:{"food_id":"xxx","food_name":"扬州炒饭"}// 返回英文:{"food_id":"xxx","food_name":"Yangzhou Fried Rice"}- 云端接口请求,需要翻译的字段添加多语言的枚举。
{"food_id":"xxx","food_name":{ "en": "Yangzhou Fried Rice", "zh": "扬州炒饭" }}- 图片资源上面不带有文字
用户界面布局适配
- 通用处理
- 英文翻译尽量简短
- 使用容器约束(绝对布局修改为相对布局)
- 调整字号大小
font.pixelSize: { if (trMgr.currentLanguage === "en_US") return 18; return 28;}